Thursday, 7 October 2021

Basque Burnt Cheesecake (& Matcha version)


Ingredients:

1 box Philadelphia Cream Cheese (at room temperature)

1/2 cup caster sugar

3 large eggs

2 tbsp cake flour (or all purpose flour)

2 tsp cornstarch

1 cup heavy (whipping) cream (at room temperature)

1 tbsp lemon juice

1/8 tsp sea salt


How to Make:

1. Preheat Oven - choose convection (with fan) to 230'C and use middle rack.

2. Line your baking paper with baking paper.

3. Mix cream cheese with sugar until fluffy and smooth with no lumps.

4. Whisky eggs in a separate bowl until smooth with no lumps.

5. Egg whisked eggs to cheese mixture until smooth and all blend well.

6. Add lemon juice to the mixture.

7. Add sieved flour and salt to the mixture little by little until all is smooth with no lumps with a spatula.

8. Add cream and mix well.

9. Pour mixture to cake tray in one go to avoid air-pockets. Tap the tray to counter top a few times.

10. Place to oven and cook for approx 25-30 min for a more creamy and fluffy texture. Approx 30-35 min for a firmer/dense texture. But keep your watch. We want to make the top a "burnt" effect. But how burnt is good for you, you need to keep your watch!

* when you take out cake, you can feel it wobble a bit. It's totally fine and just let it rest and cool down in room temperature around 2-3 hrs then serve. OR chill in fridge after cooling down directly.


** for Matcha version:

1 tbsp green tea powder (must use freshly bought one)

1/2 to 1 cup batter

Sift the green tea powder little by little as you stir and blend with the batter (from step 6 above). Then add to the big batter little by little until all mix well together. Then continue with the flour and salt steps.


Orange Duck Breast


* adapted from Thomas Keller Masterclass lesson. 

Ingredients:

French Duck Breast

Endives

Orange Juice - around 30ml to soak endives. around 100ml to cook sauce

Orange Zest

Honey - around 60-80ml

Veal/Beef Gravy - around 60-80ml


How to Make:

3 days before cooking:

1. Clean the duck breast and use tweezer to remove all hair from skin carefully.

2. Gently remove the silver skin underneath the meat.

3. Wipe dry and put to fridge (uncovered) for 2-3 nights before cooking to allow the skin to dry up.


On the day of cooking:

1. Clean endives, halve it lengthwise and soak in orange juice. 

2. Take out duck breast from fridge 1-2 hours before cooking.

3. Wipe dry and use a knife to gently trim the skin edge. Use a skewer to poke poles on skin gently.

4. Gently use your knife to score the skin in a crosshatch diamond pattern.

5. Season lightly with salt and black pepper.

6. Heat up a flat frying pan in medium high fire. Add a few drops of olive or canola oil. Then put in duck breast, skin side down. As you need to brown and crisp the skin and then have the meat cooked (say around 8-10 mins), be careful of the heat. Should not go too high to avoid the skin burning. Try press down the skin as much as possible to achieve crispy skin. Always use your hands or a palette knife to do this and to move the duck breast around the pan to avoid it sticking to the pan. Don't use tongs to avoid tearing the skin or the meat.

7. When the duck breast is around 80% done, baste it with the oil in the pan. Add the endives to the side of the pan, cutting side facing down. 

8. When it is around 90% done (or internal temperature reaches around 123'F, flip the meat side down to the pan for a short while. Then transfer duck breast to a wire rack or a plate lined with kitchen towel, skin side down and rest for 5 mins before carving.

9. Check if endives brown enough and if so, remove from pan too.

** you can use the oil in the pan to cook veggies and potatoes.


Orange Sauce (you can make this in advance)

1. Add orange juice and honey to a pot and heat it up. Once you see small bubbles on the side, turn to medium to medium high heat until you see big bubbles.

2. Add gravy of your choice to the orange honey sauce and adjust tasting to your liking and cook until it reaches a consistency you like. 

3. Lastly, grate some orange zest inside the sauce.

Enjoy!

Monday, 26 April 2021

Stir Fried Bean Sprouts with Minced Pork 大豆芽菜耸


* my mom's home maid 凤姐 (who is now in another world) taught me how to make this traditional home dish. It's one of my fav! easy to cook but difficult to cook it well. Also preparation takes long time. So be patient!

Ingredients:

Minced Pork - marinate it in the usual way (light soy sauce, sugar, sesame oil, wine, corn flour)

Bean Sprouts 大豆芽菜

Garlic x 2 tbsp - minced

Shallots x 1 big bowl - minced

Ginger juice (best to peel away skin of a bunch of ginger, pressed it and squeeze out juice from the palm)

Chinese Wine

Lettuce - prepare them in leaf shape and use as wrapper

Hoi Sin Sauce


How to Make:

1. Wash and drain the bean sprouts. [remove as much water as possible]

2. Pull out the head from the steam of bean sprouts and keep them in separate bowls.

3. Minced them separately. Size of mince - small enough but can feel the crunch!

4. Heat up a frying pan, [no need to add oil]. Once hot enough, add the minced heads of bean sprouts and keep stir fry until fragrant and dry. This part takes longer to cook.

5. Once you are happy with the above, add the minced stems. Mix well with the heads and give it a real good stir fry quickly. Drain them to another bowl.

6. In the same pan, wipe away all liquid remaining. Add oil, then minced garlic and shallot. Once fragrant, all the minced pork. Once all mixed well and pork cooked, add back the bean sprouts mix, add ginger juice and a dash of Chinese wine. Check taste and adjust with salt and pepper and sugar.

7. Put to serving plate. Serve with lettuce leaves on side and Hoi Sin Sauce.

Enjoy!


Baked Pork Chop Rice with Special Tomato Sauce


* This recipe is inspired by the former chef Au Kwok Keung at China Tang. My dad loves this dish but since Chef Au no longer working there and restaurant no longer serve this dish, I need to find out and experiment how to cook this. From an interview that Chef Au did with a newspaper years ago, I experimented. You can always replace the following tomatoes with those you like. Chef Au only said use a few types of fresh tomatoes and cooked for 2-3 hours...:)


Ingredients:

Italian San Marzano tomatoes x 1 kg

Italian Cherry tomatoes x 500g

Italian Datterino tomatoes x 500g

Onion x 1 - minced

Shallots x 1 bowl - minced

Tomato paste

Parmesan cheese - grated


How to Make:

1. Gently cut a cross on all tomatoes. Boil a pot of water. Drop all tomatoes inside the pot, switch off heat. After 2-3 minutes, when you see some skin peeling off from tomatoes, remove them at once and put them to a bowl of ice water.

2. Gently remove all skins from tomatoes. For the San Marzano or plum tomatoes, remove seeds from centre too. You can omit removing seeds part for cherry or detterino tomatoes.

3. Diced all tomatoes.

4. In a pot big enough to hold all tomatoes, heat it up, add some olive oil, cook the minced shallots and onion until fragrant and tender, then add all tomatoes. Mix well, add a round of tomato paste, then season all with salt and brown sugar. Once boiled, turn down the heat to medium/medium low and cook for at least 2 hours. You have to observe from time to time how the sauce is cooking. When you see no more "liquid" inside the pot and the tomatoes getting quite condensed, then you are almost done.

5. Preheat Grill to 230'C.

6. Cook your fried pork chop and fried rice your way. Put fried rice to a baking tray, all pork chop on top, then spread the tomato sauce on top of pork chop. Sprinkle with grated parmesan cheese and grill in oven for 5-10 min until you see the grated cheese and top of tomato sauce a bit brown, then ready to serve.


enjoy!


Japanese Porridge (Zousui)


Ingredients:

Vegetable Soup

White Miso (optional) 

Cooked Rice

Mushrooms and vegetables of your choice - cut into thin slices

Spring Onion - minced

Egg - beaten in a bowl

Sesame to sprinkle


How to Make:

1. First you prepare a soup base you like, either cook yourself or use a simple version -> Kayatoya Vegetable Stock Powder (like tea bags, boil in water for a while will do) 

2. Heat up the soup base, add the mushrooms and vegetables until they are tender enough. If you opt to have white miso, then use a sieve and gently add 1-2tbsp.

3. Add the cooked rice to the soup and mix well.

4. Gently, using the chopsticks to glide the beaten egg to the soup, while gently mixing inside the soup.

5. Check taste and season accordingly. Sprinkle with minced spring onion.

6. Pour to serving bowls and sprinkle with golden sesame.


Enjoy this delicious comfy food. This can be modified to a non-vegetarian version by replacing veg soup base with chicken or beef soup base or using  Kayanoya Dashi Stock Powder teabags to make dashi soup base. then add diced chicken.


Tuesday, 2 February 2021

Roast Chicken


* Thanks to my friend trying this recipe from Thomas Keller and proving it works. Can't do my roast chicken any other way now!!

Ingredients:

For the roast chicken:
1 whole fresh chicken
Clarified Butter
Lemon
Honey
Salt Flakes

For the brine:
5 Lemons halved
6 bay leaves
1/2 bunch (4oz) parsley
1/2 bunch (1oz) thyme
1/4 cup clover honey
1 head garlic, pressed
1/8 cup black peppercorns
1/2 cup (5oz) kosher salt
1 gallon water

Brine & Prepare:
  1. Combine all of the brine ingredients and bring to a boil. Once boiling, remove from heat and allow to cool slightly. Pour brine into a container large enough to hold both the brine and the chicken. Chill brine in the refrigerator.
  2. While the brine is chilling, remove the chicken neck and innards from the cavity, if present. Using a paring knife, cut out the wishbone from the chicken—this will make it easier to carve the chicken. Submerge the chicken in the cold brine and chill in the refrigerator overnight (or for at least 8 to 12 hours).
  3. When done brining, pat the chicken dry with paper towels. Discard the brine.

Truss the Chicken:

  1. Cut a piece of kitchen twine about 3 feet long. Tuck the center of the string under the pope’s nose (the small bit of meat at the top of the chicken’s tail end), then wrap around and over the ends of the legs. Cross the twine and slide under each leg to create a figure 8. Pull across and back at the same time to plump the chicken breast and bring the twine all the way around the breasts. As you press into the breast meat with your thumbs at the neck, cross each side of the string under the cut neck bone. Tie a slipknot, then bring each end of the string around a wing to close them to the body. Tie off to finish. Place chicken in a baking sheet or dish and leave uncovered in the refrigerator for 2 days. Doing so dries out any excess moisture from the chicken skin, allowing it to crisp beautifully during roasting.
  2. After 2 days, remove the chicken from the refrigerator and allow to temper to room temperature for 1.5 to 2 hours before roasting.

  3. Roasting:
  4. 1. Preheat oven to 230-240'C (best setting will be convectional with fan). Brush chicken with clarified butter and season all sides with salt (gently does it!! as chicken under brine is already salted). Place chicken on top of a grid in baking tray so any chicken oil or juice can be dripped to baking tray underneath the chicken for later use.

  5. 2. Roast for 20 to 25 minutes. Reduce the heat to 190-200°C, brush some more clarified butter to chicken skin and roast for an additional 20 to 25 minutes. Then brush honey all over chicken and roast for another 5-10 minutes, or until the temperature of the thickest part in the thigh area registers 71°C and the juices run clear. If necessary, return the chicken to the oven for more roasting; check it every 5 minutes.

  6. 3. Transfer the chicken to a carving board and allow to rest for 20 to 30 minutes.

  1. 4. Before carving the chicken, add a squeeze of lemon all over the chicken. Then carve the chicken into serving size, place them on top of chicken oiled rice (see below) or pasta.

  2. Rice 
  3. Make use of the fat collected from the chicken skin as well as the liver and kidney to make yummy rice as follows:

  4. 1. fried the chicken fat in a pan until yellow oil comes out, add (uncooked but rinsed) rice to the pan and coat all over. Then put rice to rice cooker. Add 50:50 water and chicken stock to cook the rice and soak rice for 15 min first. 

  5. 2. Use some more chicken fat to stir fry kidney (which are cut into small pieces) and add to the rice before cooking the rice.

  6. 3. For the liver, pan fry whole piece in same frying pan until all browned. Then cut into bite pieces. Add and mix to cooked rice later.

  7. 4. At the time you are in the step of brushing honey to the chicken, put the cooked rice at the cooking tray with chicken sitting on top, brush honey and roast for the last 10 mins. At this step, if the tray already filled with dripping butter and chicken oil, you can discard some or use all to mix with the rice. 

  8. Enjoy with your fav white wine!

Saturday, 2 January 2021

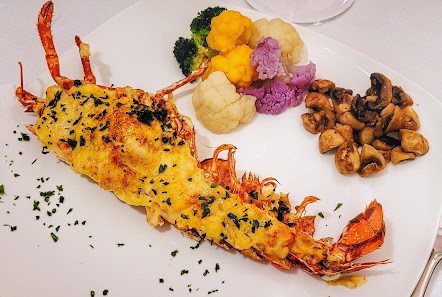
Lobster Thermidor


Ingredients:

Cooked Lobster 
Minced Shallots
Butter
Milk
Flour
White Wine
Honey Mustard
Gruyere cheese - grated
Minced parsley

How to Make:

1. Preheat oven at 200'C.

2. Preparing the White Sauce (Bechamel Sauce):
Add butter to a frying pan in medium heat, add equal parts of flour (eg. 2 tbsp of butter, then 2 tbsp of flour). Keep mixing until you have a light roux. Add milk gradually and keep whisking until the bechamel sauce reaches a consistency and thickness you like. Whenever it's too thick, add some milk. Season with salt and black pepper. Set aside.

3. Cut the cooked lobster in half lengthwise. Remove the stomach sack and dark intestines. Take the meat out of the shell and cut them up into bite size.

4. Rinse the lobster shell again in clean water and wipe dry.

5. Add butter to a frying pan, then add minced shallots, once fragrant, add a splash of white wine. Then add the bechamel sauce, mix well. Add the lobster meat and mix well. Add a spoonful of mustard. Mix well. Then add handfuls of grated Gruyere cheese. Check taste and adjust seasoning. Remove from heat.

6. Spoon the lobster mixture to the shell carefully. Sprinkle more grated Gruyere cheese on top.

7. Bake lobster at 200'C for around 10 min or until it's golden. Garnish with some minced parsley on top and serve immediately.


Enjoy with your favourite white wine!


Friday, 1 January 2021

Red Bean Dessert Soup


Ingredients:

Japanese Red beans 250g
Dried Lotus seeds
Fresh lily bulbs - must rinse under tap water to remove all mud and dirt.
Tangerine peel x 1 pc
Cane sugar x 3-4 sticks

How to make:
1. The night before your cooking, rinse the red beans and soak in water overnight.

2. Similarly, rinse the lotus seeds and soak it in water overnight.

3. On the day of cooking, rinse 1 piece of tangerine peel. Once soft, use back of knife to scrap inside of the tangerine peel.

4. Drain the red beans. For the Lotus seeds, after draining water, check every lotus seeds to ensure nothing inside the middle. The black thing inside the centre of the lotus seeds taste very bitter. So must remove.

5. Put all red beans,  lotus seeds, tangerine peel to a cooking pot. Then add 3000ml water and 3.5 sticks of cane sugar. Bring to boil, then reduce heat to medium and cook for 1 hour.

6. Remove all lotus seeds from the pot. Save it for later use. Discard the tangerine peel.

7. Blend the red beans with the soup inside in a few times. Will suggest add more beans in the beginning, so in case it's too thick if you can add the soup to mix to reach a right consistency of the blended sweet soup. After each blend, pass through a sieve to another pot.

8. Once the blending and sieving, the red bean soup should be silky smooth. Add back the lotus seeds in this pot. Also add the cleaned lily bulbs, and bring to a boil. Check taste accordingly and serve.

** fresh lily bulbs add a very nice fragrance to the red bean soup. Add this at the last step as it get broken down and dissovled if cook too long.

Enjoy!

Any leftover, save in fridge and eat it cold with vanilla ice cream.


Fresh Abalone


Ingredients:

Fresh Abalone of your choice (personally I like Japanese Black Abalones)

Ginger/ spring onion

For the Chicken Stock: old chicken, chinese ham, carrot and onion

Konbu

For the sauce: butter, minced onion, flour

How to Make:

1. First, make your chicken stock overnight. Blanch old chicken and ham. Place blanched chicken and ham to a big pot together with a carrot roughly cut and an onion roughly cut. After boil, turn to medium heat and cook for about 3 hours. Drain. After cool down, skim oil on top, then place at fridge overnight.


2. On the day of cooking. Take out chicken stock, further skim the fat on top. Reheat soup.


3. Clean abalone. Remove all seaweeds or dirt from shells. Then use toothbrush to clean all skirts of the abalone. Boil a pot of water, add ginger slices and spring onion, blanch the abalone in this pot of water for about 5-10min (abalone with the shell)


4. After blanching, some abalones maybe removed from the shell. Its ok. Rinse abalone with water. Further clean the abalone by removing the guts as shown in picture above. But do it gently in order not to tear or break the abalone.


5. Using a pressure cooker, put abalones together with a few shells (NOTE: the abalone shells can add to saltiness, so a few will do), together with a piece of konbu to the pressure cooker, then add the reheat chicken stock so that all abalones are slightly submerged under the stock. Bring to a boil, then close the cover of the pressure cooker, reduce to medium to medium low heat and cook for 1 hour. After cooking time is completed, turn off heat and let everything settled inside the pot. I think about 1 hour after cooking, the cover of the pressure cooker is ready to be released. Take out abalone gently, then sieve the soup inside. Use a skewer to test if the softness of the abalone is to your liking.

*** Pressure cooker uses 1/3 of your normal cooking time*** so if you normally need to use 3 hours to braise a kind of food, you need only 1 hour in the pressure cooker. But most important to note is right after cooking time at the pressure cooker is completed, dont try to release the cover or else accident will happen!


6. Use the soup sieved from the pressure cooker to make your abalone sauce. In a separate frying pan, heat up some butter in medium fire, then add some minced onion, then sprinkle some flour on top. Mix well, then add the soup, check taste and season accordingly. Cook until the sauce reaches the consistency you like.


you can plate your abalone with rice, pasta, risotto however you like.


Enjoy!